So what is Bun?
Bun is the new hot thing out that everyone is talking about. At least in the JavaScript community. Although not quite production ready yet, Bun is a modern JavaScript runtime, similar to Node.js. The differences though are the performance enhancements promised, so the simplest way to think about Bun is as a newer, faster environment where you can run your JavaScript code.
This is an exciting opportunity to explore a new runtime technology so let’s take a deeper dive into it and build our first REST API with it. We will build this API natively on Bun, without any frameworks. Sure, adding one will not only speed up the development time but also clean up the code. That is not what we are going for here though. The goal is to just simply see how Bun natively handles these requests.
Key Differences
The question everyone has on their mind when they hear about a new JavaScript library/framework/runtime is always “What does it do different?”. So what’s different between Node and Bun?
Performance
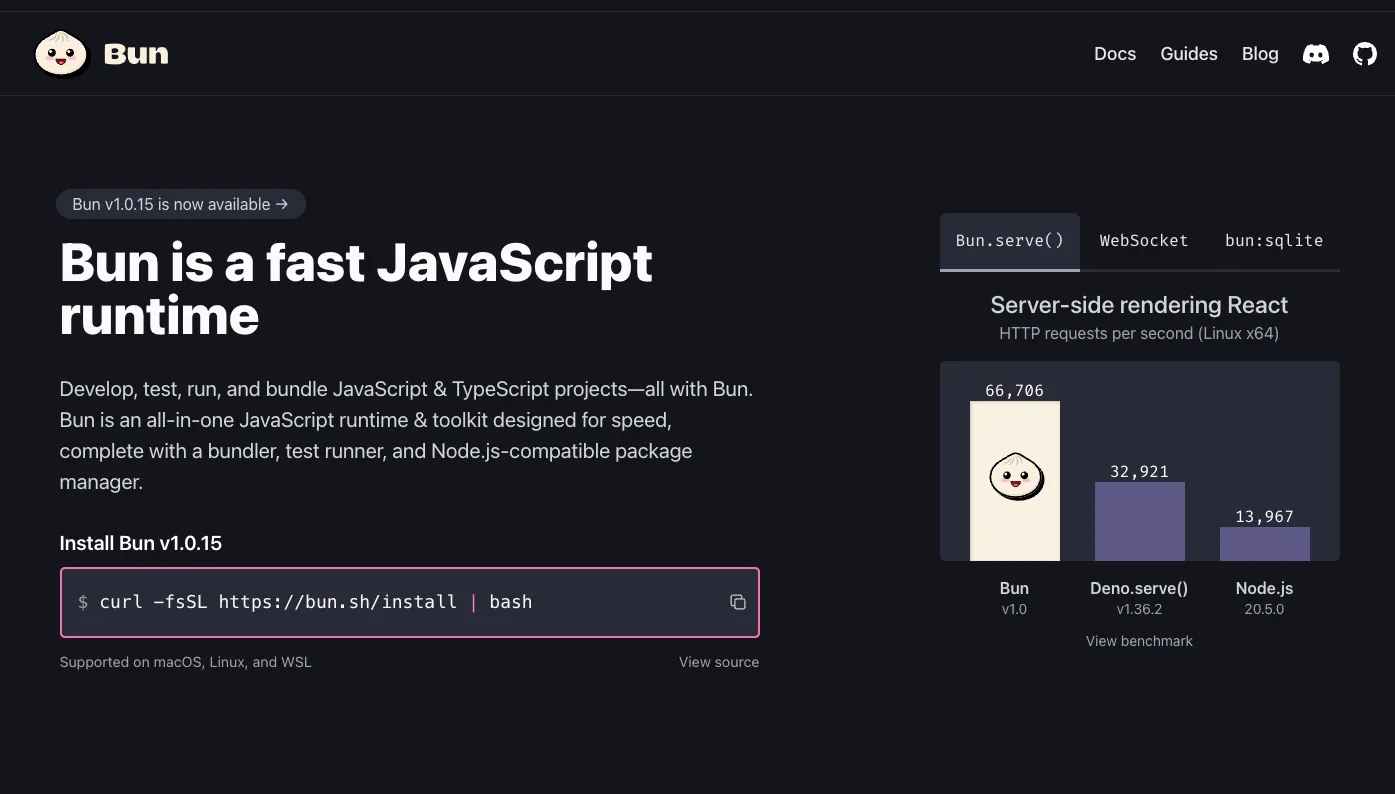
Built on a language known for its focus on performance and safety, Zig, resulted in Bun being significantly faster in many scenarios but primarily in startup time and file operations.
Package Manager
npm and yarn have been staples in the industry for years now but Bun ships with its own package manager, bun(which installs npm packages), and promises to be faster and more efficient when it comes to handling dependencies.
TypeScript Support
No need to set up a compiler to get TypeScript to work. Bun has built-in support for TS, so everything works out of the box.
Simpler APIs
Another thing Bun aims to do is simplify certain tasks with its APIs. One of them we will look at today, which is handling HTTP requests. Another one is file system operations. The goal with these APIs is to reduce the need for external libraries.
Node.js Compatibility
This is a strange one since we are comparing the two, but Bun supports many Node.js modules and packages without the need for any modification which makes it an easier transition.
Prerequisites
- Basic understanding of what a REST API is
- Basic understanding of JavaScript and Node.js concepts
Installation
This process can change so I definitely recommend checking Bun’s official website for the most up to date installation instructions, but as of writing this article the steps are as follows:
MacOS
brew tap oven-sh/bun
brew install bun
NPM
npm install -g bunCurl
curl -fsSL https://bun.sh/install | bash
curl -fsSL https://bun.sh/install | bash -s "bun-v1.0.0"
Project Setup
Let’s set up our project. We will build a REST API for a small blog application but first, we need to initialize our app.
New Directory
This is where our project will live
mkdir bun-blog-api
cd bun-blog-api
Initialize Project
This step will create our package.json which will manage all of our dependencies and scripts.
bun initREST API
Now that we have our application initialized, we can start working on our server. We first have to create a new file, which we can call index.ts.
Let’s now create the base of our server, which will simply take in a request and return “Hello, World!”.
import { serve } from 'bun';

const PORT = 6989;

serve({
  port: PORT,
  async fetch(request) {
    return new Response('Hello, world!');
  },
});

console.log(`Listening on http://localhost:${PORT} ...`);
Aaaaand thats it! We now have our server. In order to test that things are working properly, we need to start the server with the following command:
bun run index.tsYou should now see the text, “Listening on http://localhost:6989 …” in your terminal. We can validate that things are working properly by doing a curl http://localhost:6989 which should return our hello world text.
From here, we need to start working on our routes. The routes we are going to build out are the following:
- GET — blog post by ID
- GET — all blog posts
- POST — create blog post
- PATCH — edit blog post by ID
- DELETE — delete blog post by ID
To keep the example as simple as possible, we won’t be adding a database to our project. We will simply just rely on values stored in memory.
Building the routes is dependant on the request received by the fetch function. Let’s write a check for each route to see how that will end up looking:
serve({
  port: PORT,
  async fetch(request: Request) {
    const { method } = request;
    const { pathname } = new URL(request.url);
    const pathRegexForID = /^\/api\/posts\/(\d+)$/;

    if (method === 'GET' && pathname === '/api/posts') {
      // handle getting all the posts
    }

    if (method === 'GET') {
      const match = pathname.match(pathRegexForID);
      const id = match && match[1];

      if (id) {
        // handle getting a post by ID
      }
    }

    if (method === 'POST' && pathname === '/api/posts') {
      // handle creating a post
    }

    if (method === 'PATCH') {
      const match = pathname.match(pathRegexForID);
      const id = match && match[1];

      if (id) {
        // handle updating a post by ID
      }
    }

    if (method === 'DELETE' && pathname === '/api/posts') {
      // handle deleting a post by ID
    }

    return new Response('Not Found', { status: 404 });
  },
});
A lot just happened so let’s break it down into 3 steps:
- We need to grab the values we need from the Request that was received. These things include the
methodand thepath. The method simply just indicates if it was a GET/POST/PUT/PATCH/DELETE request. The path is the end portion of the url which helps us narrow down the route being hit. You will notice we also have a regex value. This is because Bun does not support path parameters (it only supports query parameters) out of the box so we have to extract the values ourselves. - Add checks in order to determine which logic we need to run. For cases where we don’t need to pass a path parameter in order to narrow down the request to a single post, the logic is fairly straight forward. We simply just have to check the method and the pathname. When a path parameter needs to be passed in, we have to do a bit more work. This involves checking the path and extracting the id from it, where the path is formatted as
/api/posts/:id. - None of our checks passed. This is our last return, which will be hit whenever the client sends a request that our API is not handling.
Now that our base structure is in place, we have to set up our Post type, our in memory list of posts and the handlers for each of our actions. One of the things we won’t be focusing on is data validation. Normally, with an API, you want to validate the data coming in but we will skip it for this tutorial in order to keep it as short and concise as possible. Let’s look at our handlers:
The interface for our post is pretty simple. Each post will have an id, a title and the content. For simplicity, all posts will be saved in an array of posts.
interface Post {
  id: string;
  title: string;
  content: string;
}

let blogPosts: Post[] = [];
GET — All Posts
function handleGetAllPosts() {
  return new Response(JSON.stringify(blogPosts), {
    headers: { 'Content-Type': 'application/json' },
  });
}
By far our simplest route, we just need to take our array of posts, stringify it and then return it in a response.
GET — Get Post By ID
function handleGetPostById(id: string) {
  const post = blogPosts.find((post) => post.id === id);

  if (!post) {
    return new Response('Post Not Found', { status: 404 });
  }

  return new Response(JSON.stringify(post), {
    headers: { 'Content-Type': 'application/json' },
  });
}
Although I said we won’t be doing much validation, it would not make much sense not to return a response if the post we are looking to query for is not found. The rest of the logic here is straight forward: grab id, search list of posts for id and return the post we found in a response.
POST — Create Post
function handleCreatePost(title: string, content: string) {
  const newPost: Post = {
    id: `${blogPosts.length}`,
    title,
    content,
  };

  blogPosts.push(newPost);

  return new Response(JSON.stringify(newPost), {
    headers: { 'Content-Type': 'application/json' },
    status: 201,
  });
}
Hopefully this piece of code never makes it close to a production environment. Beside having no validation, the id of the posts is being assigned based on the length of the array. Luckily, we are just looking to get our API up and running here with no intention of this ever being deployed for clients to use. In a later tutorial when we add an actual database to our project, we will be coming back to correct a lot of these mistakes but for now … this will do.
PATCH — Update Post
function handleUpdatePost(id: string, title: string, content: string) {
  const postIndex = blogPosts.findIndex((post) => post.id === id);

  if (postIndex === -1) {
    return new Response('Post Not Found', { status: 404 });
  }

  blogPosts[postIndex] = {
    ...blogPosts[postIndex],
    title,
    content,
  };

  return new Response('Post Updated', { status: 200 });
}
Updating a post is slightly different than creating one. We first need to find the index of the post we are looking to edit then update the post in the list. There is also a check in place for editing a post that does not exist.
DELETE — Delete Post
function handleDeletePost(id: string) {
  const postIndex = blogPosts.findIndex((post) => post.id === id);

  if (postIndex === -1) {
    return new Response('Post Not Found', { status: 404 });
  }

  blogPosts.splice(postIndex, 1);

  return new Response('Post Deleted', { status: 200 });
}
As you might have guessed, delete works almost the same as updating except instead of updating a post in the list it removes it.
Outcome
Now, all we have left is to put everything together and start testing. Your server should now look like the following:
import { serve } from 'bun';

const PORT = 6989;

interface Post {
  id: string;
  title: string;
  content: string;
}

let blogPosts: Post = [];

function handleGetPostById(id: string) {
  const post = blogPosts.find((post) => post.id === id);

  if (!post) {
    return new Response('Post Not Found', { status: 404 });
  }

  return new Response(JSON.stringify(post), {
    headers: { 'Content-Type': 'application/json' },
  });
}

function handleGetAllPosts() {
  return new Response(JSON.stringify(blogPosts), {
    headers: { 'Content-Type': 'application/json' },
  });
}

function handleCreatePost(title: string, content: string) {
  const newPost: Post = {
    id: `${blogPosts.length}`,
    title,
    content,
  };

  blogPosts.push(newPost);

  return new Response(JSON.stringify(newPost), {
    headers: { 'Content-Type': 'application/json' },
    status: 201,
  });
}

function handleUpdatePost(id: string, title: string, content: string) {
  const postIndex = blogPosts.findIndex((post) => post.id === id);

  if (postIndex === -1) {
    return new Response('Post Not Found', { status: 404 });
  }

  blogPosts[postIndex] = {
    ...blogPosts[postIndex],
    title,
    content,
  };

  return new Response('Post Updated', { status: 200 });
}

function handleDeletePost(id: string) {
  const postIndex = blogPosts.findIndex((post) => post.id === id);

  if (postIndex === -1) {
    return new Response('Post Not Found', { status: 404 });
  }

  blogPosts.splice(postIndex, 1);

  return new Response('Post Deleted', { status: 200 });
}

serve({
  port: PORT,
  async fetch(request: Request) {
    const { method } = request;
    const { pathname } = new URL(request.url);
    const pathRegexForID = /^\/api\/posts\/(\d+)$/;

    if (method === 'GET' && pathname === '/api/posts') {
      return handleGetAllPosts();
    }

    if (method === 'GET') {
      const match = pathname.match(pathRegexForID);
      const id = match && match[1];

      if (id) {
        return handleGetPostById(id);
      }
    }

    if (method === 'POST' && pathname === '/api/posts') {
      const newPost = await request.json();
      return handleCreatePost(newPost.title, newPost.content);
    }

    if (method === 'PATCH') {
      const match = pathname.match(pathRegexForID);
      const id = match && match[1];

      if (id) {
        const editedPost = await request.json();
        return handleUpdatePost(id, editedPost.title, editedPost.content);
      }
    }

    if (method === 'DELETE' && pathname === '/api/posts') {
      const { id } = await request.json();
      return handleDeletePost(id);
    }

    return new Response('Not Found', { status: 404 });
  },
});

console.log(`Listening on http://localhost:${PORT} ...`);
Before testing, if your server is still running from when we first created it, you will have to restart in order for all the changes to be applied.
Conclusion
Congratulations! You have now created your first REST API using Bun. The code is not the cleanest and there are things, like path parameters, that are not supported out of the box. This is where using a framework can make life a lot easier by both providing more functionality and also cleaning up a lot of the code. As you can tell, this works for a small API, but if we were to expand this, the code can quickly get out of hand.
I plan on building on this project further by adding things like a database, validation, a web framework with API utilities and more. Let me know what other things you would like to learn more about. If you enjoyed this article and found it useful, check out my other articles here on Medium and also my YouTube channel where I cover most of these things in video formats.